Print MTG proxies at home: my exact Epson ET-8500 setup
This is not a generic printing guide. It is the one setup I actually use, screenshot by screenshot: an Epson ET-8500, glossy photo paper, a tuned color profile, lamination and a card die cutter. Every value on this page is transcribed from my own driver dialogs. Copy it as a whole, then adjust to taste from a working baseline.
My driver runs in German; every setting below quotes the German label (umlauts written as ae/oe/ue) with an English translation next to it.
Printing on Fabricard cardstock instead? No lamination needed: Premium Proxy Cardstock
Why these settings
The printer's neutral defaults are made for documents and everyday photos, not for card faces next to real Magic cards. Printed with defaults, my sheets came out flatter and cooler than the real thing. The settings here are the result of comparing test sheets against real cards on the table and adjusting until the difference stopped mattering: a photo media type for the glossy paper, the strongest quality mode, and a custom color correction that pushes saturation and warmth up. If you use different paper or a different printer, treat my values as a starting point, print one test sheet, and compare against a real card before you commit a batch.
Hardware and materials
Printer
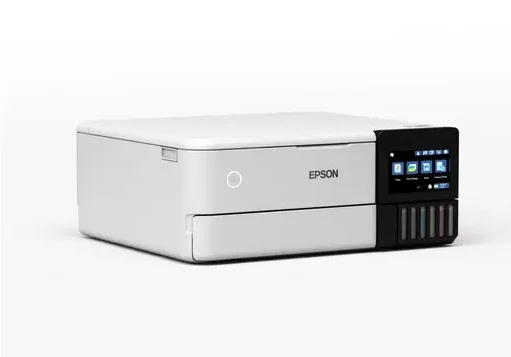
Epson EcoTank ET-8500. Any photo-capable inkjet can work; the driver labels below are Epson's, but the concepts (media type, quality, color sliders) exist in most drivers.
Paper
Albyco Fotopapier Inkjet A4 Glaenzend, 200 g/m2, double-sided printable, 100-sheet pack. Double-sided matters: fronts and backs go on the same sheet in two passes.
Lamination
A4 laminating pouches, 216 x 303 mm, 2 x 50 micron, glossy, plus a compact laminator. The pouch adds stiffness and a card-like snap.
Rotary trimmer
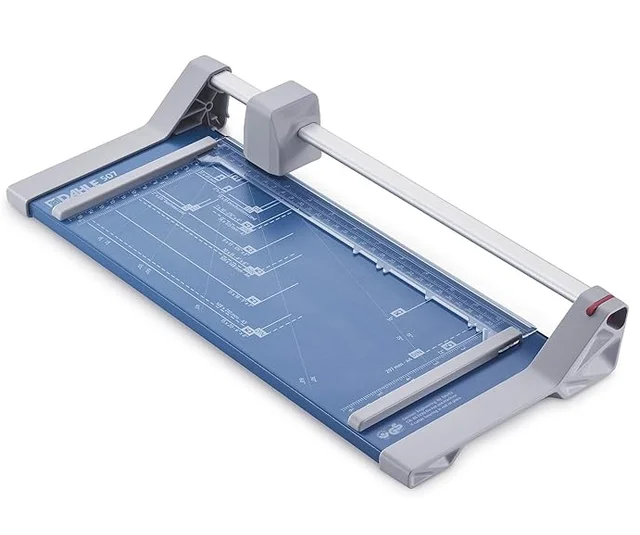
A Dahle 507 rotary trimmer cuts the laminated sheet into strips of three cards each, so the strips fit into the die cutter.
Die cutter
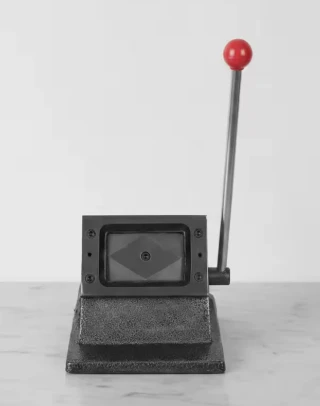
A card-size die cutter punches each card to 63 x 88 mm with rounded corners in one stroke. That is why my sheets need no cut guides at all.
Epson driver settings, step by step
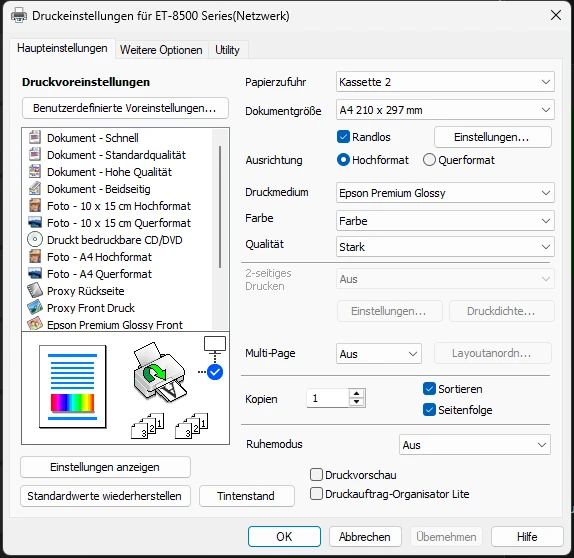
Open the printer properties from the print dialog. On the first tab, Haupteinstellungen (main settings), set:
- Papierzufuhr (paper source): Kassette 2 - my photo paper lives in the second cassette.
- Dokumentgroesse (document size): A4 210 x 297 mm.
- Randlos (borderless): ON.
- Ausrichtung (orientation): Hochformat (portrait).
- Druckmedium (media type): Epson Premium Glossy - the media type controls how much ink the printer lays down, so match it to your paper class even with third-party paper.
- Qualitaet (quality): Stark - the strong quality setting.
- 2-seitiges Drucken (two-sided printing): Aus (off). Backs are a separate pass, never auto-duplex.
On the second tab, Weitere Optionen (more options):
- Farbkorrektur (color correction): Benutzerdefiniert (custom) - the actual values live behind the Erweitert (advanced) button, next section.
- Bidirektionales Drucken (bidirectional printing): ON.
- Bild spiegeln (mirror image): OFF.
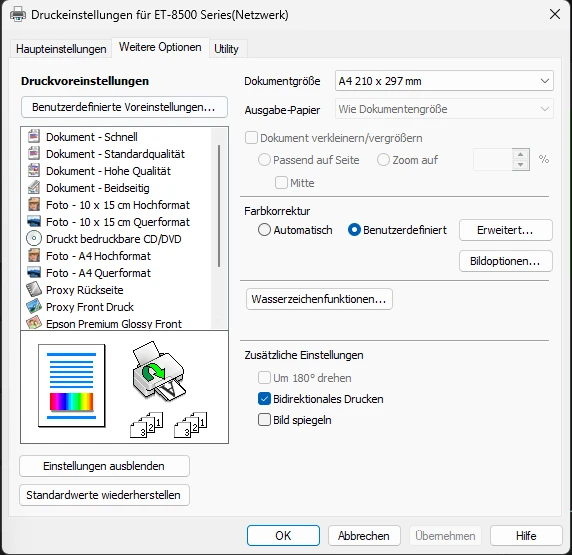
Save the whole configuration as a driver preset (Benutzerdefinierte Voreinstellungen). The two presets I use for proxies are "Proxy Front Druck" for fronts and "Proxy Rueckseite" for backs, so a print run is two clicks instead of ten dialogs.
Color calibration, and why it deviates from the defaults
Behind Farbkorrektur > Erweitert sits the dialog that does the heavy lifting. Farbmodus (color mode) is set to EPSON Vivid, adjustment method Schieber (sliders), with these values:
- Helligkeit (brightness): -6
- Kontrast (contrast): +7
- Saettigung (saturation): +25
- Cyan: -6 · Magenta: +6 · Gelb (yellow): +4
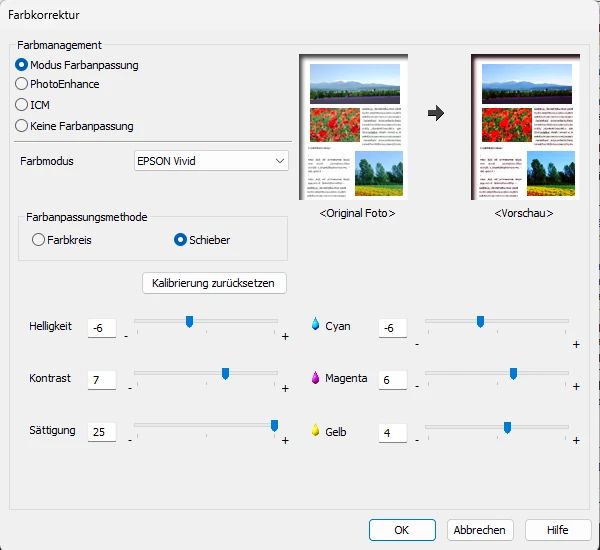
Why so far from neutral? Because on this printer and this glossy paper, neutral prints look washed out next to a real card. Real cards are printed offset on coated stock; an inkjet reproduction loses saturation and warmth on the way. EPSON Vivid plus +25 saturation brings the colors back to card level, the slight darkening (-6 brightness, +7 contrast) keeps blacks dense, and the cyan-to-warm shift (-6 cyan, +6 magenta, +4 yellow) stops reds and skin tones from drifting cold. These numbers came from repeated test sheets held next to the real cards they copy, not from theory. On other printers the right values will differ, but the direction (more saturation, a touch warmer, slightly darker) has held up for me across paper batches.
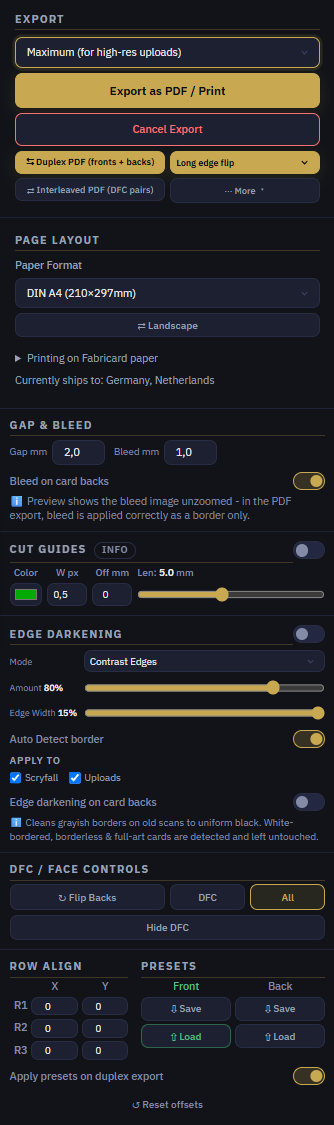
Under Bildoptionen (image options), three more switches:
- Text verstaerken (emphasize text): Mehr verstaerken (more).
- Duenne Linien verstaerken (emphasize thin lines): ON.
- Glatte Kante (edge smoothing): ON.
Card text is tiny; these three keep rules text and thin frame lines crisp at play distance.
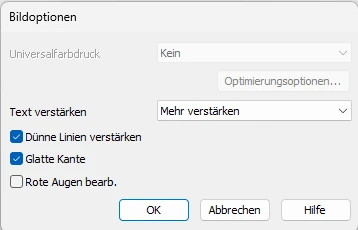
Fabricard export settings: front and back
I use Fabricard to export one file with front and back pages. This is the configuration shown in my sidebar:
- Export tier: Maximum (for high-res uploads), 900 DPI.
- Export action: Duplex PDF (fronts + backs). Use this button to create the duplex file.
- Flip edge: Long edge flip.
- Paper format: DIN A4 (210x297mm), portrait.
- Gap: 2,0 mm; Bleed: 1,0 mm.
- Bleed on card backs: ON.
- Cut Guides: OFF. The stored guide values are green, width 0,5 px, offset 0 mm and length 5 mm; they are inactive while Cut Guides is off.
- Edge Darkening: OFF. Its stored settings are Contrast Edges, Amount 80%, Edge Width 15%, Auto Detect ON, Scryfall and Uploads checked, card backs unchecked. They do not apply while the master toggle is off.
- DFC/Face controls: All.
- Row Align: X and Y are 0 mm for every row.
- Apply presets on duplex export: ON.
During duplex export, Fabricard applies the saved Front preset to the front pages and the saved Back preset to the back pages automatically. The screenshot shows the current sidebar values, not the contents of those saved presets.
The workflow: print, dry, laminate, cut strips, punch
Print the fronts
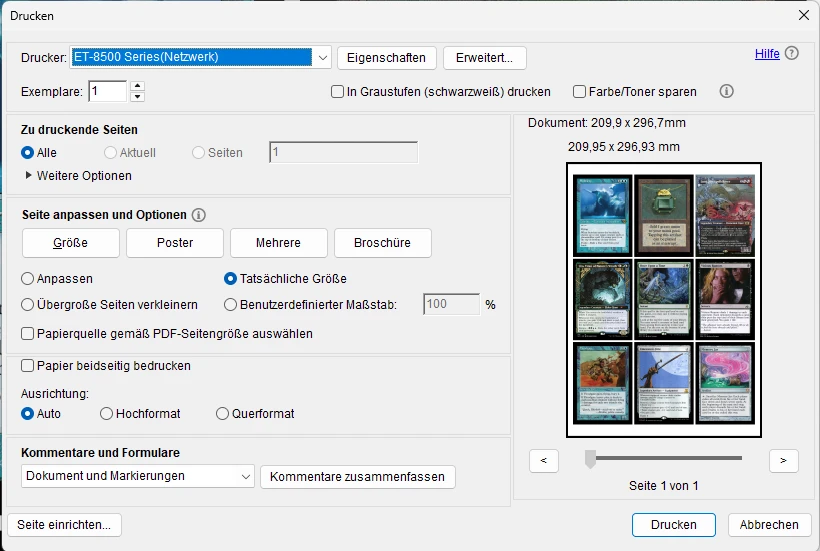
Export the front PDF from Fabricard, open it, and print with the "Proxy Front Druck" preset. In the print dialog: Tatsaechliche Groesse (actual size, 100 percent) and Papier beidseitig bedrucken OFF - the back run is its own pass.
Print the backs
Reinsert the printed sheets, switch to the "Proxy Rueckseite" driver preset and the back layout in Fabricard, print. If you are unsure about feed direction, the duplex guide covers the one-sheet test.
Let the ink dry
A few minutes on the desk. Glossy photo paper holds a lot of ink, and laminating a damp sheet traps moisture.
Laminate
Sheet into the 2 x 50 micron glossy pouch, through the laminator. The pouch is 216 x 303 mm, slightly larger than A4, which keeps the seal margin off the cards.
Cut the sheet into strips
The laminated sheet is too big for the die cutter, so I cut it into strips of three cards each with a Dahle 507 rotary trimmer. Rough cuts between the rows are fine - the die cutter defines the final edges.
Punch the cards
One stroke per card in the die cutter: exact card size, rounded corners, no scissors, no ruler, no cut guides.
Since July 2026 Fabricard also has a one-file alternative to the two runs above: Duplex PDF (fronts + backs) in the Export block writes fronts and backs onto alternating pages, with the back pages mirrored for the selected flip edge, so double-faced cards line up in every column. I keep printing my uniform back sheets with the two-preset routine documented here, that is exactly what it is for - but if your deck has DFCs, the duplex file is the simpler and correct path. Details in the duplex guide.
Back alignment: invisible offsets instead of calibration
Here is the trick that saves the whole calibration dance: my back sheets use extended bleed without gaps. The card backs tile edge to edge with 2 mm of bleed each, so there are no regular borders anywhere on the back sheet. When the die cutter punches a card, a small front/back offset of a millimeter simply does not show - there is no border line that could sit visibly off-center. The back just looks like a back.
If you WANT regular back borders instead (for example for sharp white frames), you have to calibrate once: print one front page and its back page, hold the sheet against a light source, measure how far the backs sit off in millimeters, and dial exactly that into Row Align (X and Y per row) in Fabricard's sidebar. The double-sided printing guide walks through that measurement step by step. I skip it entirely - the borderless back makes it unnecessary.
Check your scale before cutting a batch
Before you punch through a whole print run, put a ruler on one printed card: it must measure 63 x 88 mm. If it does not, a scaling option in the print dialog is interfering - make sure it says Tatsaechliche Groesse / actual size / 100 percent, never "fit to page". One minute with a ruler saves a hundred sheets of photo paper.
The finish: sleeves and gloss
Fresh out of the laminator the cards are noticeably glossy, and on the table that looks like what it is. But once they are sleeved and shuffled into a normal deck, the gloss all but disappears for me and the card looks remarkably close to a real one - that has been my experience across every deck I have built this way. Matte laminate is a valid alternative if gloss bothers you even in sleeves, but in my tests it desaturates the colors and leaves them looking grayish and paler, which is exactly what the color calibration above fights against. That is why I stay with glossy; your table, your call.
Which printers do these settings fit?
The ET-8500 is my tested reference - it is the one machine every value on this page was dialed in on. That said, the Epson EcoTank driver dialogs are very similar across the series, so the setting names should carry over to siblings like the ET-8550 (the A3+ variant) and other EcoTank photo models; on an ET-2850, ET-4850, ET-5850 or ET-7750 you should find similar tabs and sliders. Same driver family, same settings names - just to be clear: I have not tested those machines myself, so on a sibling model treat my values as the starting point for your own test sheet.
On a non-Epson inkjet the labels differ but the principles transfer directly: pick the glossy photo media type that matches your paper, the highest quality mode your driver offers, borderless A4, a custom color correction (more saturation, slightly warmer, slightly darker), and always print at actual size, 100 percent - never fit-to-page.
Troubleshooting
Backs misaligned or upside down? Feed direction and flip edge are the usual suspects - the double-sided printing guide covers both, including the one-sheet test workflow and the Row Align fields. Cards printing at the wrong size? See the scale check above. Colors off on different paper? Reprint one test sheet and re-tune the three main sliders (brightness, contrast, saturation) first; the CMY shifts rarely need to move much.